Hobart House
A couple with absolutely no home improvement skills try to fix up a 1905 Craftsman in the Historic West Adams area of Los Angeles.
Monday, July 23, 2012
Selecting Paint Colors
I knew I wanted the house green. I read Bungalow Colors by Robert Schweitzer to get some ideas on how to proceed. His tip: Find 6 base colors that you like, and paint large samples. Decide if you like any of them. This was about a year ago, so I don't remember the one I picked!!!!!! But it was one of these.
Saturday, March 10, 2012
More Old Pictures
This picture is facinating to me. Not just because the doggie is soooo cute. My last post showed a picture with windows on the porch, but the original, tapered columns showing. Here, presumably some years later, the original columns were covered up with more linear, modern looking tall columns in a wood tone in an attempt to bring the look of the home into a more mid-century style. A lot of molding was cut in order to accomodate these things. Theses were gone when we moved in, but the cut molding remained.
Old Pictures of the House
Thanks to Art Copper for sending some old family photos. Art grew up in our house. He still comes by the old neighborhood sometimes. The house was sold after Arthur Copper Sr. passed away.
To Paint, or What to Paint.
As I mentioned last post, part of closing our permit for the porch work was to repaint any new or repaired, primed wood. Keep in mind our 8 year old paint job, done by the previous owner, and flipper, was a bad one to begin with, in a color I never liked but grew used to, and in terrible condition, chipping and peeling. Additionally, I always knew I wanted to paint this house green. This was the thought process. Notice how the ideas increase in complexity and, more importantly cost!!
1. Repaint the whole porch in the existing color.
2. Repaint the porch green, knowing a whole house paint job would follow in years to come.
3. Repaint the front of the house.
4. Repaint 3 sides of the house, leaving the back as-is.
5. Just paint the whole darn thing.
6. Just paint the whole darn thing, and do it right, including scraping over 100 years of old, lead-based paint off of the siding.
Guess which option we chose?? The most expensive, of course!!!
New beams and column support on front porch
Scaffolding supports the front porch during the work.
4X4s which will be hidden inside the columns.
This post is long overdue. In November, or December of 2010, we started this project. The purpose was to correct the slight dip in the front porch. The "beam" that stretches the length of the front porch turned out to be a hollow decorative box. Same for the six tapered columns along the front of the house. None of these elements offered any structural support to the porch, hence the sagging effect. To correct this, the columns were opened up, 4X4s sunk into concrete piers under the porch. Also, an engineered beam placed across the length of the porch. Scaffolding was put up to support the porch during this work. It was at this point that one of our neighbors called to report the work to building and safety. We had not pulled a permit for the work. After a bunch of red tape and a few fees, the permit was issued. We obtained approval from the Mills Act (who monitor that everything we do to our house is historically acurate) and found out that the permit would be considered closed when the final painting was done.......that began the painting saga. (More about that in future posts.)
Another challenge was putting all the original siding and wood from the columns back correctly. The columns have a taper to them. They are narrow at the top, and wide at the bottom. Our contractor couldn't quite figure out how to get them aligned so that they didn't look all crooked from the street. Somehow we got it figured out after a bunch of trial and error. Don't assume your contractor will know how to put together what is taken apart! Also, we had to have more trim made to replace that which had been cut away and damaged over the years. (This porch used to be enclosed in windows. Those were removed before we purchased the house. Lots of trim was cut away to allow the windows to sit flush.)
Here's an example of where trim had been cut away.
Saturday, August 14, 2010
Workout Room
This is our upstairs porch. We have never really used it for anything, but always planned that it would be our workout room. We had the floor refinished several years ago. Spring break was when we began painting, but due to the 120 panes of glass in the windows, this was a time consuming process. Alas, the project continued into summer break. Finally done painting, and replacing the windows, we had the ceiling insulated with 3" thick rigid foam insulation. We covered that up with bamboo, which I don't really like the look of but it will do for now. Perhaps we'll take that down at some point and put up beadboard. In any case, the room is much cooler with the insulation. All the windows were screened, and we bought 3/4" foam gym mats for a nice cushiony base. In went our small collection of weights, etc. Let's see if we end up using it!!!
Downstairs Summer Porch
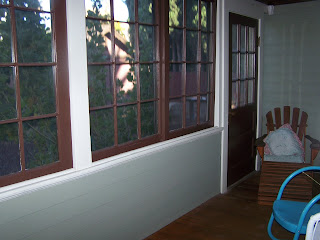
OK, so we worked on this last summer, but I never took the time to post it. Basically, this was a storage room for the first four years we lived here. We had the floors sanded, the bead board on the ceiling stripped and refinished. We painted. That doesn't seem like a big deal, but this room has 2 french doors containing 15 panes of glass a piece, and 6 windows with 12 panes of glass each. Consider priming, painting, then scraping and cleaning over 100 panes of window glass and you have yourself quite a project. Finally got around to having the windows screened this week. The porch features a window that looks into the back of our dining room built in, so you can see some of our ceramic bowls, etc. from the porch. I picked up these three vintage metal chairs from the 1950's for $5.00 apiece at a Pacoima second hand store, and the cute wicker plant stand at a garage sale on our street for a buck. The adirondaks make for a nice place to read or take an afternoon snooze!
Thursday, February 26, 2009
Home Depot Commercial Shoot
This was the scene at our house today (tomorrow as well) as a Home Depot commercial was being shot at our neighbor's house. This is great for us as the production company sends a tidy bit of cash our way for the use of our driveway to set up the craft service table,lay some wires across our property, and trample over a few of our plants! They have set up a temporary fence with a lot of potted plants between the two houses in an effort to screen out the ugly house--as well as modified our neighbor's house inside and out. Added bonus--all the free snacks we want!! If you see a Home Depot commercial with this kid playing soccer out front--think of us!
Sunday, February 15, 2009
Recycling
I love hunting for cool old stuff on Craigslist, thrift stores, estate sales, etc. Here are some of our recent finds. All of the photos show the fabulous pillows from our friend Jennifer's estate sale. She has superb designer taste that I will never have, so what better way to add some style to our place than to buy up all her old stuff? We got all these pillows in a mix of great fabrics, down filled, to toss around the guest room and on our window seat. A pair of mission style nightstands, which match our bedroom funiture, which we found on Craigslist for about a quarter of what they would be if we bought them new. And another nightstand, also from Jennifer's estate sale, $40. I think it's Danish from the '40s or '50s. Thanks to everyone who is getting rid of great used stuff!
Saturday, February 14, 2009
Lighting on the Staircase
We found these great old globes at a local yard sale--$10 for the pair. Old globes don't fit into standard size fixtures, so we sought out the help of local lighting expert Carlos Castaneda to find some appropriate size fixtures. They were originally a chrome finish, so we had them refinished in an oil rubbed bronze. The longer one is on the upstairs landing, the shorter, more flush mount is on the lower staircase, and allows for a little more headroom when coming down the stairs. Not bad!
Sunday, January 25, 2009
Living Room and Dining Room Complete
This has been a long time coming...at the beginning of last summer we hired the genius Henry to begin stripping the box beams and wainscotting in the living room, dining room, and downstairs hall. This was a long, costly process but after the experience of doing most of the upstairs wood ourselves, AND having it take three years, it was well worth having Henry do the dirty work for us. He did a far better job than I could have done, and the photos do not do it justice. He worked 6 days a week for close to 3 months to achieve these results. Imagine how many weekends that would have taken us! (I would highly recommend Henry to anyone who needs some wood stripped or refinished. Contact us for his number.) We also had to reproduce some of the plate rail that was missing in places. Previous owners seemed to remove and/or hack at pieces at random.
Next step, the wood floors were sanded and polyurethaned by Francisco and his crew. They also did our upstairs floors in '07. Final step, paint. With the help of our good friend Patrick at Patrick Bustad Painting, many repairs were done to these old plaster walls which were in terrible shape from all the taping off during the wood stripping process. We picked from Benjamin Moore's historic color palette, Summerdale Gold for the living room. This is an amazing color which changes dramatically depending on the light and time of day. The dining room is a dark room in the NE corner of the house, and we had a hard time with the color. We slapped up about 10 different samples of gold, green, and caramel, but nothing screamed out. Finally our painter said, I'll finish today if you can pick a color. We bit the bullet and picked the best of the bunch and it turned out quite well. HC 122, Great Barrington Green. I'm not one of those who is scared to put color on a wall, and don't believe that a dark color in a dark room makes it feel closed in, small, etc. It is rich and delicious.
My parents 1950's colonial revival dining room set isn't perfect, nor is the eclectic mish mosh of living room furnishings, but that will have to wait for another time. At least we got a few pictures on the wall! If any of you readers out there have a pair of old Stickley Morris chairs or a nice unneeded settle, feel free to send them our way!
Carlos Castaneda, who has a lovely little lighting and antique shop on La Brea, shined up the old lighting fixture, and replaced the Home Depot issue chain with a more appropriate chain and hardware. We are both suffering from back aches after rehanging that thing yesterday afternoon.
Finishing touches will include swapping out the modern light switches for push button switches, and ordering some hammered copper switch plates.
Subscribe to:
Posts (Atom)